Docs

Creavim Documentation

The complete Creavim workflow, from content and product management to professional page design, AI production, importing, publishing and analytics.

Getting Started

A new publication can begin in four different ways. Choose the starting point that matches your work from the home screen.

  • Start with a template: choose a professionally designed layout and adapt it to your content.
  • Start from scratch: set the page size and build your own layout on a blank canvas.
  • Continue from InDesign: import IDML with its fonts, styles and master pages.
  • Continue from PDF: retain the original appearance of every page and convert selected pages into editable content when needed.

Importing (IDML & PDF)

Choose the import method that fits the source. IDML preserves an editable design structure; PDF retains the original page appearance and supports selected-page editing.

  • IDML: in InDesign use File → Export → IDML, then upload it to Creavim.
  • IDML import preserves fonts, paragraph/character styles and master pages.
  • PDF: pages retain their original appearance; add links and interactions, or open a selected page for editing when necessary.
  • See the Import guide for a step-by-step walkthrough.
Import guide

Editor Basics

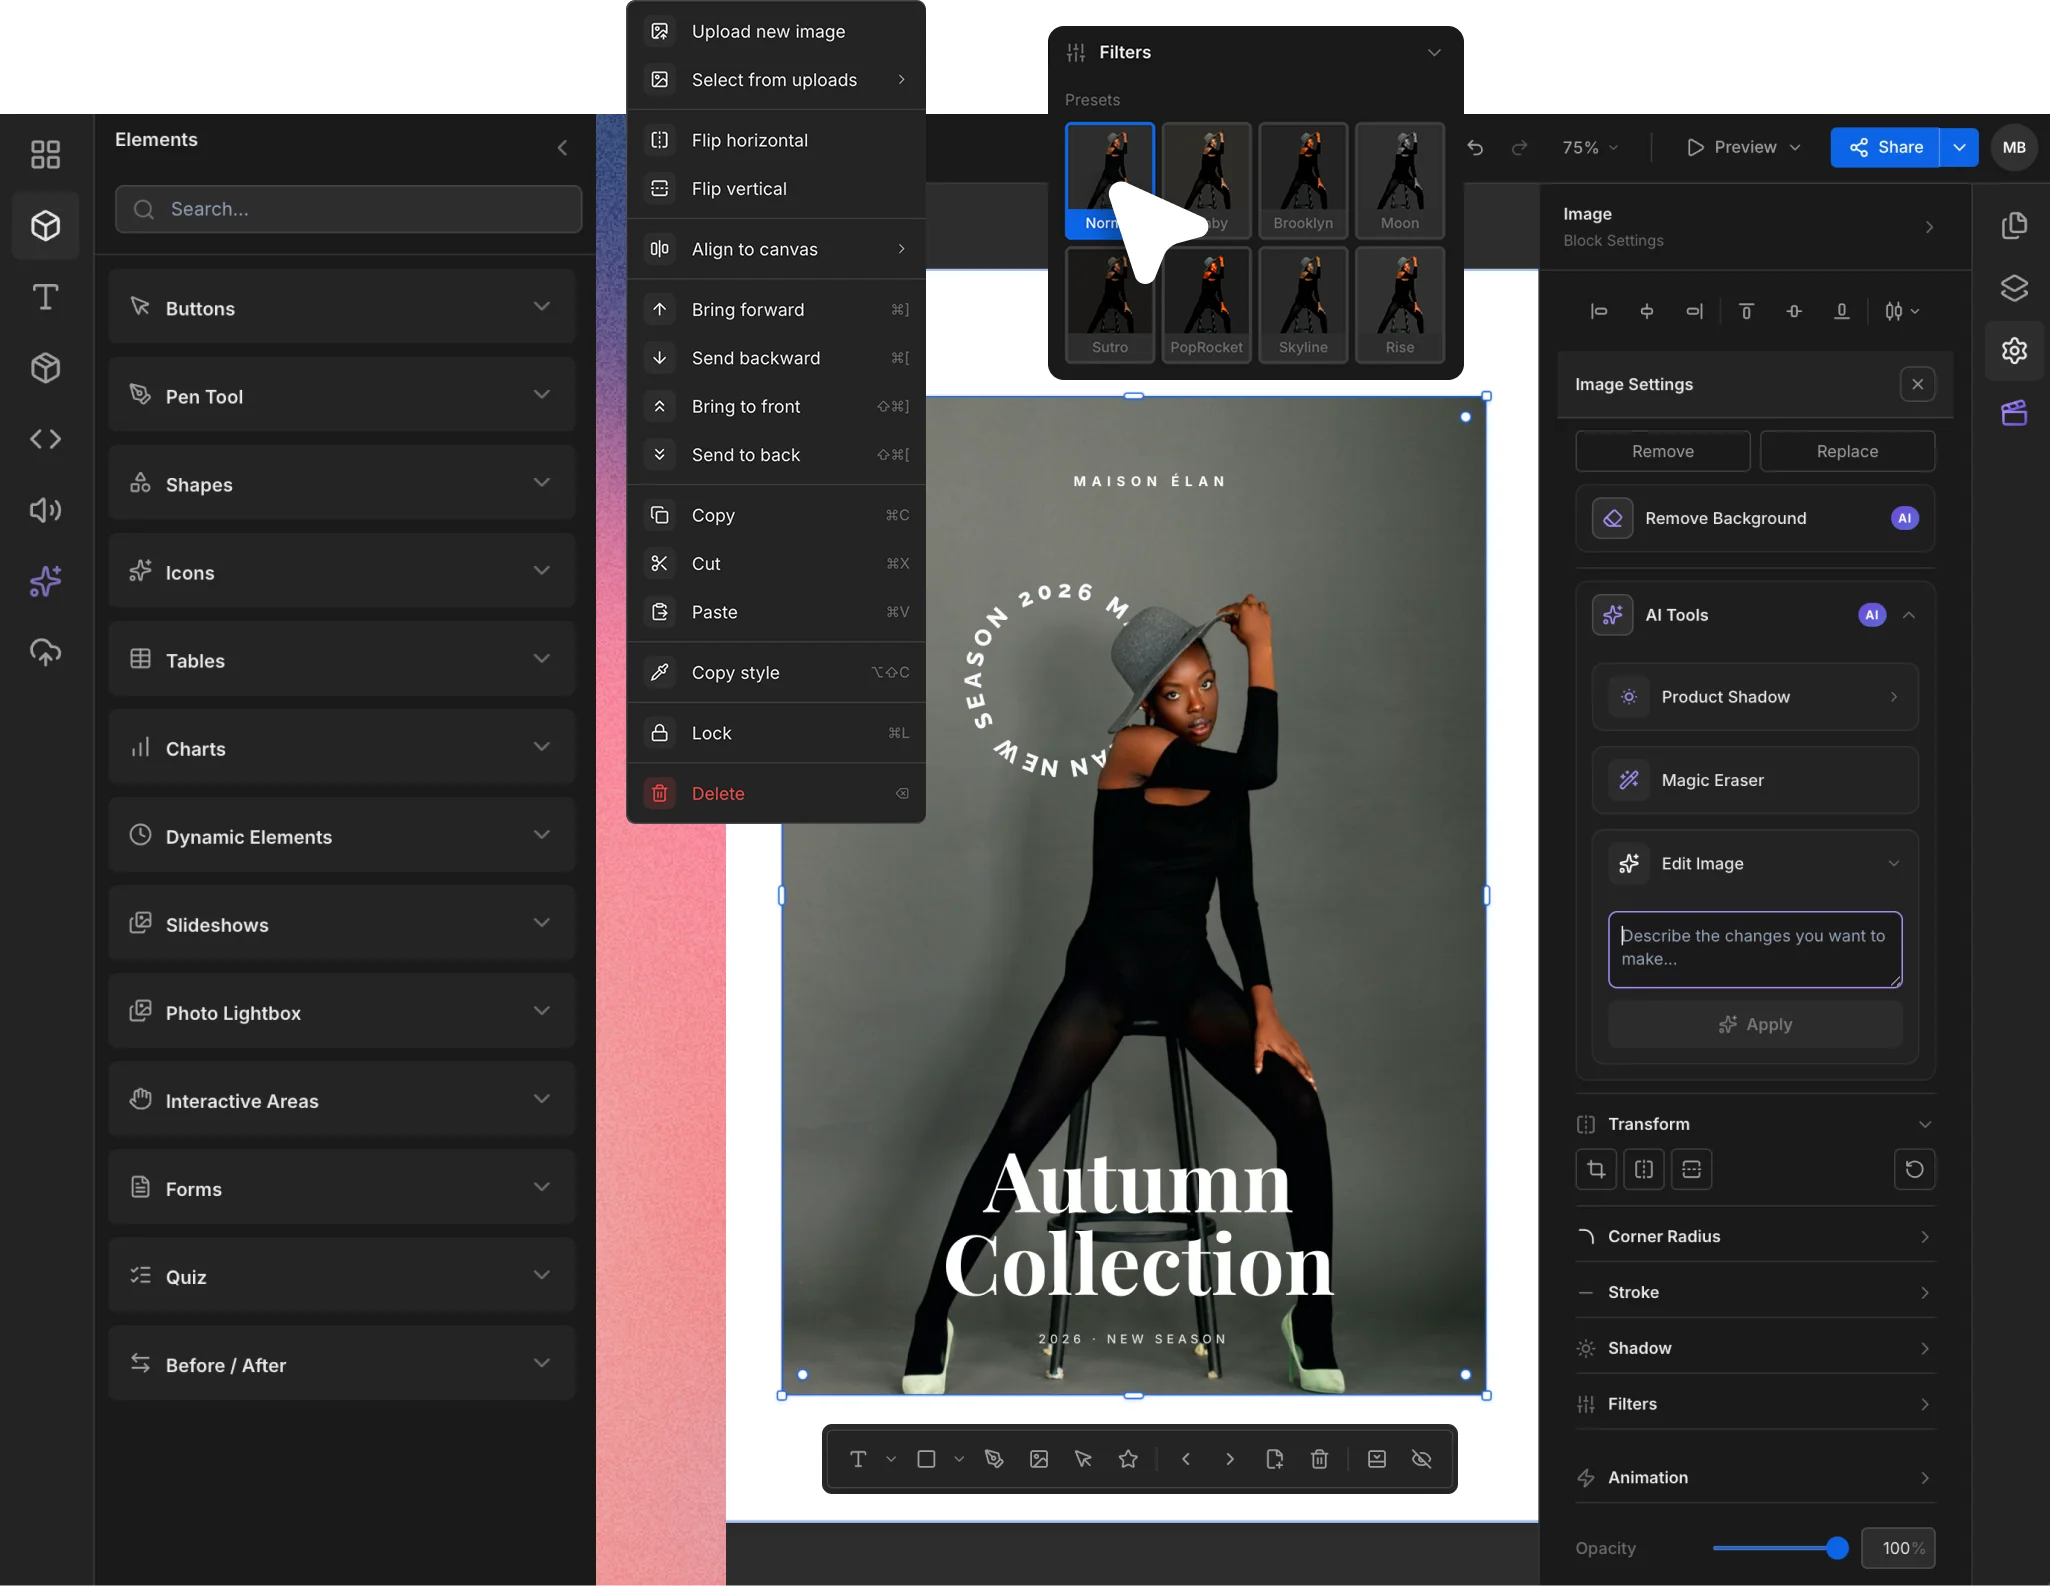
The professional canvas is designed for precise page composition, with every selected element controlled from its own properties panel.

  • Left panel: Templates, Elements, Text, Products, Shapes, Icons, Buttons, Tables, Embed, Audio, AI Image and Uploads.
  • Select and move: click a block; resize and rotate with handles; Shift for multi-select.
  • Smart alignment: guides snap to other blocks and the page center as you move.
  • Master pages: design repeating elements (logo, page numbers) once, applied to every page.
  • Page management: add, delete, duplicate and reorder pages from the filmstrip; work in single-page or spread view.
  • Undo / redo, layer ordering and locking work on every block.
  • Right panel: position, size, style, shadow and corner radius settings for the selected block.

Brand system

Define brand fonts, colors and logos centrally to keep a consistent visual language across publications.

  • Add primary and secondary colors, approved logos and the font families used by the brand.
  • Use brand settings as the starting point for new pages, then override them at page or block level when required.

Workspace and pages

The editor's workspace adapts to your preferences. These settings live in your browser; they do not affect the catalog itself or how it is published.

  • Canvas background colour: choose your working surface. Click one of the presets or enter any colour in the picker. A light surface makes it easier to see where the edges of a dark design end. One click returns you to the default.
  • Page ordering: reorder pages by dragging, either in the filmstrip under the canvas or in the page list in the right panel. In the right panel the drag handle sits at the left of each row.
  • Page view: single page or spread. Use spreads to see the printed layout.
  • Grid and snapping: show the grid, snap blocks to it, and add rulers and guides for precise alignment.
  • Zoom: pick a percentage or fit the page to the screen.

Blocks

Creavim pages are built from editable blocks. Text, media, data and interaction blocks work together on the same canvas.

  • Text: full typographic control over font, size, line height, letter spacing and color.
  • Image: upload or pick from Uploads; crop, corner radius, shadow, filters.
  • Shape and Pen Path: ready shapes or freehand pen drawing; fill, stroke, editable points.
  • Icon: a categorized icon library.
  • Button: a clickable link to a page, URL or email.
  • Video: upload or link MP4; cover image and autoplay options.
  • Slideshow: multiple images/videos cycling in one area.
  • Table and Chart: price lists, comparisons, data visualization.
  • Countdown: a live timer to a campaign deadline.
  • Product Card and Product Grid: bound to your real products, including price, image and variants.
  • Form: contact forms and quizzes; responses are collected in your dashboard.
  • Before / After: a slider comparison image.
  • 3D Viewer: embed a GLB model readers can rotate.
  • Interactive Image (Hotspots): clickable points on an image, opening a product, video or note.

Text formatting

The text block's right panel carries formatting tools alongside typography. Some apply to the whole block while it is selected; others apply to the characters you select after entering the box.

  • Paragraph styles: save a text's appearance as a style and apply it to other blocks. Update the style and every linked text changes with it; detach a single block if you want it to go its own way.
  • Effects: shadow, glow, outline, echo, and neon. Pick a preset and fine-tune it. The outline is a real contour: it adds weight around the letters and survives export.
  • Superscript and subscript: for m², H₂O, or footnote numbers. Select the character and press the button; pressing again removes it. Pressing superscript while in subscript swaps the two.
  • Bulleted and numbered lists: can be applied with the block selected, without entering the text box. Indentation scales with font size, so alignment holds when you resize the type.
  • Bold, italic, underline, strikethrough, and case conversion (UPPERCASE, lowercase, Title Case).
  • Alignment: left/center/right/justify horizontally, top/middle/bottom vertically, with a separate option for the last line when justified.
  • Line height, letter spacing, and colour; plus links (page, URL, or email).

Image effects

Image and shape blocks apply most design-tool effects directly on the page. Effects are non-destructive: turn one off and the image returns untouched.

  • Fade: softly dissolves the edge of an image into transparency (the equivalent of InDesign's gradient feather). Linear or radial, with direction, angle, start and end controls. Used for cover images that blend into the background and product shots lifted off their backdrop.
  • Blend mode: controls how the image merges with what sits beneath it. All the industry-standard modes are there (Multiply, Screen, Overlay, Soft Light and the rest), for textures and colour layers.
  • Filters: brightness, contrast, saturation, blur, grayscale, sepia and more.
  • Corner radius: type a value or drag the corner handle to set it by eye.
  • Crop and background removal: fit the image to its frame; clear the background in one click (AI).
  • Mirror copy: creates a horizontally or vertically mirrored duplicate beside the selected block, so symmetric layouts do not need manual copy-and-flip.
  • Transform section: flip horizontally/vertically, rotate, and reset; opacity is set per block.

Product Management

Manage products, variants and media in one source, then reuse the same structured data across multiple publications.

  • Add a product: name, SKU, price, stock, description and multiple images.
  • Variants: options like color and size; each variant can have its own price and image.
  • Brands and categories: organize products; filtering and layout follow automatically.
  • Bulk import: bring hundreds of products from CSV or Google Sheets in one go, including SKU, variants, images, price and stock.
  • Google Sheets sync: connect a sheet; the catalog updates when price and stock change.
  • Card image selection: choose per card which product image is shown.

Products, variants and categories

Manage product data independently from page design and reuse the same product across multiple publications.

  • Keep SKU, price, stock, description, brand, category and multiple images in one product record.
  • Assign separate prices, stock and media to variants such as color or size.
  • Connect product cards and grids to this source to reduce repeated data entry.

Live product data and Google Sheets

Update frequently changing fields such as price and stock from a connected Google Sheets source.

  • Map sheet columns to Creavim product fields and review the first import before applying it.
  • Use SKU matching to update existing products and create records for new rows.
  • Review changes before publishing to confirm that connected catalogs use the intended data.

AI Tools

Image, video and copy tools run inside the production workflow; results can go directly to the page, file library or product gallery.

  • Remove Background: clean, transparent product images in one click.
  • Product Shadow: soft or hard realistic shadow; best on transparent images.
  • Magic Eraser: paint over an unwanted object to remove it.
  • Edit Image: describe the change; PhotoRoom for fast single-frame work (1 credit), GPT Image 2 for precise edits that preserve the scene, with reference support (4 credits).
  • Generate Image: create from text; base it on an existing image and guide it with up to 5 references.
  • Image Studio: batch-process up to 30 images at once. Source from catalog products or uploads; download results, add to canvas, save to a folder or write to the product gallery.
  • AI Video: pick a reference image, describe the motion; generate a 5-10 second product video and add it to the canvas.
  • AI Copy: product descriptions, titles and sales copy in a professional, friendly, formal or concise tone.

Batch production in Image Studio

Bring product and content images into one place, then apply the same edit or AI operation to a selected set.

Where to open it

ManageStudio

Open Manage from the top navigation, then switch to the Studio tab. Studio is designed for preparing an image set together rather than editing a single page element.

How it works

  1. 1

    Choose an image source

    Use product galleries from the Products source, or add files that are not attached to a product under Uploads.

  2. 2

    Define the set

    Select one image or up to 30 images that should receive the same operation.

  3. 3

    Complete the operation settings

    Choose an operation from the plus button. Depending on the operation, select a color, shadow, lighting, subject or text mode, and provide a prompt when required.

  4. 4

    Start the batch

    Apply processes the complete selection with the same settings. Track progress and review each result inside Studio.

What does each operation require?

Operations do not all work the same way. Complete the fields shown before applying an operation, especially for generative AI tasks.

Direct operations

Background removal needs no additional instruction; select the images and apply the operation.

Operations with options

For background color, shadow, light and color correction, enhancement or text removal, choose the color, mode or subject shown in the controls.

Scene operations that require a prompt

Choosing Place in scene is not enough on its own. Describe the environment, surface, lighting, framing and any details that must remain unchanged.

Model and apparel operations

After choosing Virtual model or Ghost mannequin, describe the model appearance, pose, camera angle, background and product details that must be preserved. Clear guidance produces a more controlled result.

Results never overwrite the source images

Studio creates separate outputs first. After review, download them, add them to the canvas, save them to a folder or append them to the relevant product gallery.

  1. Follow Manage → Studio. Under Products, gallery images from your product records are listed automatically.
  2. For images that are not attached to a product, switch to Uploads and add the files directly to Studio.
  3. Select the images, open an operation from the plus button and complete the displayed controls. For generative scene or model operations, add a prompt before applying it to the full selection.

Edit Image: two engines

Edits the selected image from a written instruction. Two engines are available and the credit cost depends on the engine.

  • PhotoRoom (1 credit): fast single-frame work such as background swaps, scene cleanup and small touch-ups.
  • GPT Image 2 (4 credits): changes only what you ask for while preserving the scene, faces and product details; best for precise requests like recoloring or adding accessories.
  • On the GPT Image 2 tab, pin up to 2 frames with + Reference; the word "reference" in your instruction points to those frames.
  • Example: with the mannequin product shot selected, pin the model photo as a reference and write "put this dress on the model in the reference, keep her scene".
  • The result replaces the selected block; duplicate the block first if you want to keep the original.

AI video from a still image

Use a still image as the reference for a short video and describe the intended motion in text.

  • Choose a clear source image and describe movement, camera direction and what must remain stable.
  • Track the generation job while it completes in the background.
  • Save the finished video to your files and place it in a publication with a video block.

Background removal

Separate the main subject from its background and create a transparent output.

  • Inspect fine edges and semi-transparent areas at a close zoom.
  • Work from the editor for one image or use Image Studio for a complete set.
  • Combine the transparent result with a new background, shadow or page composition.

Ghost mannequin

Turn an apparel photo into a clean presentation that retains the garment shape without showing the mannequin.

  • Use a clean, front-facing source image with clearly visible garment boundaries.
  • Review critical regions such as collars, sleeves and inner surfaces after generation.
  • Keep a consistent capture and crop standard across the product set.

Reference-based generation

Use an existing image as a subject or composition reference when creating new scenes.

  • State which product, person, color or composition details must be retained.
  • Generate environment and framing options as separate variations.
  • Review brand, product and visual accuracy before using a result in a publication.

Generate images from text

Create original visuals for campaigns, presentations, social content and publication pages.

  • Define the subject, setting, light, framing, aspect ratio and visual language in a concise brief.
  • Refine the first result with additional direction or generate alternative variations.
  • Check brand and contextual suitability before adding the image to a page.

Generate color variants

Prepare different color options from one image while aiming to retain product form and material texture.

  • Select the region to change and define the target color clearly.
  • Review texture, shadows, reflections and surrounding color spill.
  • Save approved variations to the relevant product or variant gallery.

Retouch and remove unwanted objects

Remove marks, labels, small objects or surface defects from a selected region.

  • Mark only the region that needs to change to preserve surrounding detail.
  • For large areas, work through smaller controlled selections instead of one pass.
  • Inspect repeated textures and edge transitions at a high zoom.

AI-assisted publication copy

Prepare editable titles, descriptions and short marketing copy from source data.

  • Use verified product or content information as the source.
  • Set tone, length, audience and language before generation.
  • Review accuracy, brand voice and regulated claims before publishing.

Translation and Multilingual Publishing

Produce target-language catalogs from one master catalog. Each language becomes a separate catalog with its own page document and its own publish state.

  • In Catalog Management → Translations, set the master catalog's language once, then pick a target language.
  • Define brand terms to leave untranslated, glossary entries and extra instructions before you run the translation.
  • Correct the output line by line in the review screen; rows you approve are kept in later translation runs.
  • Edit and publish each target catalog on its own. Changes there do not touch the master.

Managing multilingual publications

Languages are derived from the master catalog. A derived catalog is edited and published separately, while the master stays the single reference.

  • Pick a target language and start the translation. The target catalog is created for you and arrives as a draft.
  • Page edits, image swaps and price changes you make in a target catalog belong to that language only.
  • Re-translating the master rebuilds the target's page content from the source, and edits you made in that language are lost. Settings, cover image and publish state are kept.
  • To keep working in one language, duplicate that catalog. The copy becomes an independent master, and you can derive new languages from it.
  • Text length shifts between languages: German usually runs longer than the source, Chinese shorter. Check for overflow and line breaks before publishing.

Publishing & Sharing

Publish with a link, embed the work on a website or apply access rules for a defined audience.

  • Publish from the editor's top right; republish with Update after changes.
  • Sharing: a single link, QR code and embed code for your website.
  • Flipbook viewer: readers flip through pages; mobile friendly.
  • Privacy: password protection, expiring links and download permission control.
  • Custom domain: present the publication on your own domain, white-label.
  • Cart and orders: readers add products to a cart and send the order to you in one click.
  • Form responses: contact form and quiz results are collected in your dashboard.

Forms and quizzes

Add contact forms, information requests or structured quizzes directly to a publication.

  • Configure fields, required states and the message shown after submission.
  • Review responses in the dashboard and export them as CSV when needed.
  • Forward notifications into an existing workflow through email or webhook.

Forward form submissions to email and your CRM

The form block's Notifications section offers two channels: a notification email and a webhook. The webhook POSTs every submission as JSON to the https address you provide; Zapier or Make picks that packet up and writes it into your CRM, spreadsheet or any other app.

  • For email notifications, select the form block in the editor and enter the address in the Notifications section of Form Settings. Every submission is forwarded there, and submissions also collect on the panel's Form Responses page.
  • For a CRM connection, create a new Zap in Zapier with Webhooks by Zapier → Catch Hook as the trigger, and copy the address it gives you. In Make, the equivalent is the Webhooks → Custom webhook module.
  • Paste the address into the webhook field of the form block's Notifications section and publish the catalog. Notifications fire only on real submissions in a published catalog.
  • Fill the form once in the published catalog as a test, then capture it in Zapier with Test trigger. Zapier only offers field mapping after it has seen a sample packet, so don't skip this step.
  • In the Zap's action step, pick the target app (HubSpot, Pipedrive, Google Sheets, Gmail…), map the form fields to the target fields and publish the Zap. From then on every submission creates a record automatically.
  • The outgoing packet carries submissionId, catalogId, formBlockId, formTitle, submittedAt and a data object with the form answers. The request includes the header X-Creavim-Event: form.submission.created, useful for filtering if you connect your own system directly.

Cart, order and quote requests

Let readers select products in a publication and send a structured enquiry.

  • Configure add-to-cart behavior and the product fields shown on each card.
  • Send the request summary through WhatsApp or a PDF workflow.
  • Verify price, variant and contact information before publishing.

Access control

Define who can open each publication and how it may be shared.

  • Choose public, password-protected or private access.
  • Manage expiring links, downloads and website embed permissions per publication.
  • Use custom domains and white-label settings for organization-owned publishing.

Exporting

Export the publication as PDF or selected pages in image formats.

  • Layout: single pages or two-page spreads.
  • Scope: the whole catalog, a page range or a single page.
  • Balance file size with the resolution setting.
  • Viewer download permission is toggled in Privacy settings.

Analytics

Track how published content is viewed and which elements receive interaction.

  • Views and unique visitors.
  • Per-page attention: where readers spend time.
  • Product interactions: what gets clicked and added to cart.
  • The data is in your dashboard; no guessing.